Sharp photos are essential for capturing every detail, especially in nature and wildlife photography. With a DSLR camera, you have full control over your settings, which allows you to achieve crisp, clear images. In this article, we’ll cover practical tips to help you get the sharpest results from your DSLR, focusing on settings, techniques, and tools that make a real difference in the quality of your shots.
Why are my DSLR photos not sharp?
The most common reason is that the focus might not be accurate. If your subject isn’t in focus, even the best camera and lens will produce blurry results.
Another possibility is that your lens isn’t performing at its best. Lenses have an optimal aperture range where they produce the sharpest images. Shooting outside this range can lead to softer photos.
Additionally, your camera’s sensor resolution plays a role. A low-resolution sensor might not capture as much detail, which can affect sharpness.
Camera shake is another common issue, especially if you're shooting at slower shutter speeds or without proper stabilization. Even slight movements can blur your photo.
Finally, incorrect settings, such as a high ISO or a very wide aperture, can reduce sharpness by introducing noise or limiting depth of field.
Choosing the right lens
Different lenses excel in different situations, and selecting the right one for your shot can make all the difference.
- Prime lenses vs. zoom lenses: Prime lenses typically offer sharper results than zoom lenses because they have fewer moving parts and a simpler design. They often perform better at wide apertures, providing excellent clarity. Zoom lenses, while versatile, may not be as sharp at the extreme ends of their zoom range. However, a high-quality zoom lens can still deliver great sharpness if used within its optimal focal length range.
- Wide aperture lenses: Lenses with wider apertures (such as f/1.8 or f/2.8) allow more light to hit the sensor, which is helpful in low-light conditions. However, wide apertures also reduce depth of field, which means less of your image may be in focus. For sharper photos with greater depth of field, an aperture of f/5.6 to f/11 is usually a better choice, especially in daylight or when you need everything in focus.
- Lens quality and brand: Not all lenses are created equal. High-quality lenses from well-known brands (such as Canon, Nikon, or Sigma) are designed for better optical performance, minimizing issues like distortion and chromatic aberration. These lenses are more likely to give you sharp results, even at wider apertures.
- Focal length: Shorter focal lengths (like 35mm or 50mm) generally produce sharper images, while longer focal lengths (such as 200mm or 300mm) may suffer from softness, especially if you're shooting handheld or at slower shutter speeds. A tripod is often necessary when using long lenses to maintain sharpness.
- Image stabilization: Some lenses come with built-in image stabilization (IS or VR), which helps reduce camera shake, especially in low-light or handheld shooting conditions. While it doesn’t replace the need for a steady hand or tripod, it can improve sharpness in challenging situations.
When choosing a lens, it’s important to balance sharpness with other factors like convenience, your shooting style, and the type of subjects you're photographing.

Mastering the focus
DSLRs offer both autofocus (AF) and manual focus options, and knowing when to use each is important. Autofocus is fast and effective, especially for moving subjects or when you need to capture a shot quickly. Most modern DSLRs come with several autofocus modes, such as single-point AF, continuous AF, and auto-area AF.
Single-point AF is ideal for still subjects, as it lets you choose exactly where you want the camera to focus. Continuous AF is better for moving subjects, as the camera constantly adjusts the focus as the subject moves. Auto-area AF can be convenient, but it’s not always as precise, since the camera decides the focus area for you.
Manual focus, on the other hand, gives you full control, and it can be crucial in situations where autofocus struggles, such as low light or when you’re photographing subjects with little contrast. In these situations, manual focus allows you to ensure the sharpest possible result. Using live view on your camera’s screen and zooming in can help you achieve precise focus in manual mode.
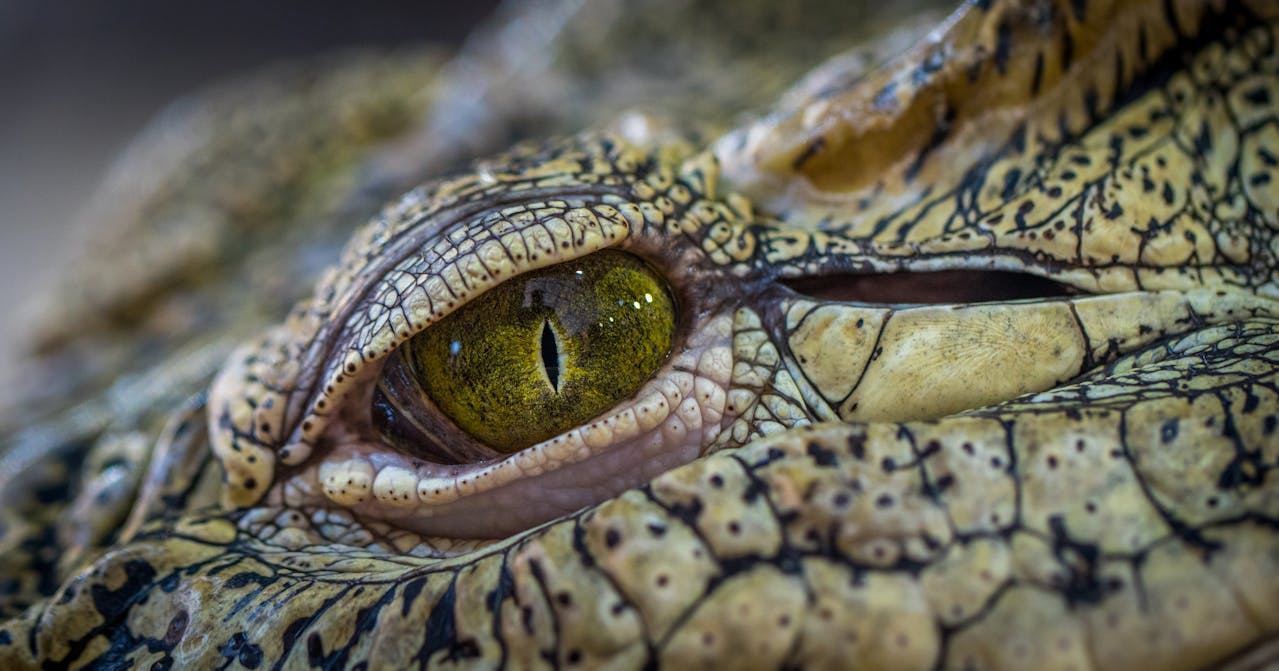
When focusing, always be mindful of the focal plane. If you’re photographing wildlife, for example, focusing on the eyes is key to getting the sharpest shot.
In landscape photography, focusing one-third into the scene usually results in the sharpest image throughout, due to the way depth of field works. Pay attention to the depth of field as well; if you’re shooting at a wide aperture, your focus may only cover a small area, leading to parts of your image appearing blurry.
The key to avoiding motion blur
Shutter speed is a critical factor in capturing sharp images because it controls how long the camera’s sensor is exposed to light. A slow shutter speed can cause motion blur, which happens when either the subject or the camera moves during the exposure.
For still subjects, a fast enough shutter speed will freeze motion and ensure the image stays sharp, while a slower shutter speed might lead to softness or blurriness, even if the camera is perfectly steady.
The right shutter speed depends on several factors, including the type of subject you're photographing. For stationary subjects, a shutter speed of 1/125 second or faster is usually sufficient to prevent any noticeable blur.
For faster-moving subjects you’ll need a much quicker shutter speed, such as 1/500 second or even faster, to freeze the action. If you're photographing birds in flight, for instance, a shutter speed of 1/1000 second or more might be necessary to capture sharp details without any motion blur.
In addition to subject movement, camera shake can also lead to blurring, especially at slower shutter speeds. If you’re shooting handheld, it’s important to use a shutter speed fast enough to counteract small movements you might make while holding the camera.
A common rule is to use a shutter speed that’s at least the inverse of the focal length of your lens. For example, if you're using a 100mm lens, aim for a shutter speed of 1/100 second or faster. However, this rule doesn’t guarantee absolute sharpness, especially if you're photographing small, fast-moving subjects.
For those moments when you need to use slower shutter speeds, a tripod can make a huge difference. It stabilizes the camera, preventing the shakes that naturally occur when shooting handheld. Additionally, using a remote shutter release or the camera’s timer can further eliminate any vibrations caused by pressing the shutter button.

Stabilization techniques
Whether you're using a tripod, improving your handheld technique, or relying on built-in stabilization, knowing the right stabilization techniques will help you capture sharp images.
- Using a tripod: When shooting at slower shutter speeds or when you need the camera to stay perfectly still, a tripod ensures your camera remains steady, preventing unwanted movement. For landscapes, long-exposure shots, or macro photography, a tripod is crucial for achieving maximum sharpness.
- Handheld techniques: Hold the camera with both hands, keeping your elbows close to your body to minimize any movement. Standing with your feet shoulder-width apart, and leaning against a stable surface like a wall or tree, can help further reduce shake. Take a deep breath, exhale slowly, and press the shutter gently to avoid jarring the camera.
- Image stabilization systems: Many modern lenses and cameras feature built-in image stabilization (IS) or vibration reduction (VR). These systems can be particularly helpful in low-light conditions or when shooting handheld with longer lenses. However, it's important to remember that while IS or VR can help, they can’t eliminate all types of movement.
- Use of remote shutter release or self-timer: Even when using a tripod, pressing the shutter button can cause slight vibrations, which can affect sharpness. A remote shutter release allows you to trigger the shutter without physically touching the camera, eliminating any risk of camera shake. If you don’t have a remote, using your camera's self-timer function is a good alternative. Setting the timer for a couple of seconds gives the camera time to stabilize before the shot is taken.
- Stabilizing post-processing: In some cases, small amounts of camera shake can still be corrected in post-processing. Software tools like Adobe Lightroom and Photoshop offer ways to reduce motion blur, but it’s always better to prevent shake from happening in the first place. While editing can help in a pinch, it can’t fully restore sharpness lost due to significant movement.
Mastering these techniques, along with knowing when and how to use them, will give you more control over your images, resulting in clearer, more defined photos.
Common mistakes to avoid
A high ISO can lead to sharpness issues. While higher ISOs help in low-light conditions, they introduce noise into the image, which can make the photo appear soft and less detailed. To avoid this, try to keep your ISO as low as possible while still maintaining proper exposure. If you're shooting in low light, consider using a tripod or a wider aperture to compensate instead of cranking up the ISO.
Also, overcompensating with post-processing can be a mistake. While editing can help improve sharpness, over-sharpening an image in post-processing can introduce unwanted artifacts, making the photo look unnatural. It’s better to focus on getting the sharpness right in-camera rather than relying too much on software correction.
Avoiding these mistakes and understanding the technical aspects of capturing sharp images will greatly improve the quality of your photos. With practice, you'll learn how to consistently apply the right settings and techniques to ensure your images are as sharp as possible.